Thought as part of updating I would start showing you bits of the process of making the letter.
First stage is trying to plan out all the major fabric colours so all the letters will fit together, particularly the base fabric, but also any other major colours in the picture.
They're laid out more or less where they'll be eventually but the areas covered are obviously larger since the fabric isn't cut out.


Once that's done I started cutting out the front's background fabrics the right size (I'd already done the back plain fabric and two layers of interfacing to stiffen the square).
I could do these letters in any order, and when I did the cloth book I did do them in any order, but as a librarian of about 9 years and library worker of about 11, I couldn't resist the urge to alphabetise the making.
Anyway, skipping to letter C:
Firstly I try and finalise any remaining decisions on fabric and colours. At this point I have not chosen what colours all the letters themselves will be so this is the first thing I try to decide. Then if there are any other fabric colours/choices I go on to them. I also debate about whether a details will be fabric or embroidered. Embroidery is easier but if it's a large area, it can take ages. I'm not very patient.
Letter C I already knew that it was a green background and that the cat would be fading out using gauze from a very orangey yellow.
I really wasn't sure what colour letter to choose so I asked my mum about colours and she reminded me about that thing they teach you in primary school (oops) - the colour wheel.
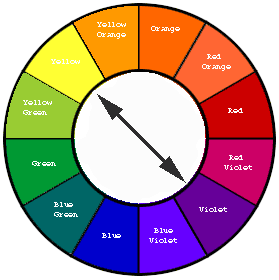
From that we talked about choices and I finally came up with purple because it looked like the purple I had would be complementary with yellow and OK with the green (yes really).
So on to cutting out the top layers of fabric. I make templates and then draw them on and cut them out :


I can't always draw on the base fabric either because it might show or because it's too dark to pick it up, so instead I trace the design onto one of the sheets of interfacing (stiffening material used in collars etc). I trace it through the right way, and then the reverse as once it's pinned in place I can only see the reverse.


There are no inbetween shots for this one as I got anxious early on and wasn't sure it would be OK.
Looks pretty darn OK to me I think

No comments:
Post a Comment