Monday 30 September 2013

G[r]eek Alphabet - it's not over....and won't be just yet BUT

....I'm sure you'd like a summary post so you don't have to wade through everything to find the letter you are after. So I'm going to repeat the links to design post and then list the links to posts about letters in progress.

Updated pretty much finalised designs for all the letters

Making the letters


A is for Athena - completed and finished. (no before shots)
B is for Big Bird - includes early stage of creation and completed (same page as completed A)
C is for Cheshire cat - includes general talk on colour decisions and stages of creation
D is for Dalek
E is for Elmo
F is for flamingoes and feegles
G is for Ghostbusters

H is for Heracles
I is for Icarus
J is for Jam
K is for Kraken
L is for Luggage
M is for Medusa
N is for Narcissus
O is for Odin
P is for Pomegranate and Persephone
Q is for Queens
R is for R2D2
S is for stars
T is for towels and Tardises
U is for unicorns
V is for vampire
W is for Wonder Woman
X is for Xena warrior princess
Y is for Yggdrasil
Z is for Zaphod Beeblebrox

Thursday 26 September 2013

G[r]eek Alphabet - what next?

Well obviously T comes next and this is where you come in. I am hoping to make the Tardis doors openable and I am wondering what to put behind it. Before you get all excited let me 'splain something to you:

T for Tardis and Towel design with Cm tape measure for scale. Tardis is about 8.5cm tall T for Tardis and Towel design with inches tape measure for scale. Tardis is about 3 inches tall


Yes, you are seeing right, this Tardis is approximately 8.5cm tall with doors just under 6cm the whole gap left by the open doors will be 3cm. Or for refuseniks of metric life. The Tardis is just under 3 and a half inches tall total, with doors just over 2 inches tall and the maximum opening will be just over an inch.

However much you beg me to put TEN(nant) in there it's just not going to happen. Consider. The Queens sans crowns are about 5.5cm tall. It would be too much of a squish.

One friend has suggested stars. I had thought perhaps maybe a golden yellowishness and a vague impression of the console.

I did consider making a hole through to the other side and bridging it with gauze. BUT and it's a big but, the letter isn't designed to be held up, it's designed to be on the wall with velcro, while they are removable, looking through doors at the beigey offwhite back is not all that exciting or endless.

Thoughts? Let me know! I haven't started yet. I'm resting on my laurels.

In other news, I took a picture of the stack of letters the other day.

All my alphabet letters stacked up ready for the next stage
It looks amazingly large and rather small at the same time. Keep on moving! Or something!!


G[r]eek Alphabet : S is for Stars

I have been looking forward to R and S for several reasons. I like how well the design has come out but also because they are EASY. For a given value of easy of course as a friend pointed out. She doesn't think any of them are easy. But if you think of R2, I had to pin and sew the R out of ribbon but R2 was just one piece of felt (no hemming).

For stars we are even more low tech. Like K for Kraken there is only a letter to applique and then it's all in the embroidery and here the embroidery is even simpler. A few stars, a few lines. Yes the S itself is curvy which takes some doing with a straight flat ribbon but basically there isn't a lot. As a bonus I now had an opaque black fabric thanks to a surprise donation from a friend out of nowhere.

Thus there is not much for me to show you for this as I didn't do any early photos...at least I thought I'd snapped it with just the S sewn down but I can't find it and to be honest, it's not really much of a before shot.

S for Stars (constellation of Ursa Major or the Plough)

Callisto, Zeus and Ursa Major and Ursa Minor

The constellation depicted on this letter is sometimes called Ursa Major, to go with the constellation Ursa Minor, and sometimes The plough. It also can be used to find the North Star in the sky.

It's another tale of Zeus on his seduction track, with the girl getting transformed this time instead of Zeus. She has a fling with Zeus, gets pregnant but her virginal boss/friend Artemis is mad and turns her into a bear. Later having had her son Arkas, she nearly gets killed by him as he fails to realise she isn't a bear, and to save the situation both are made into starry constellations.

Source : Theoi Callisto : Princess of Arcadia

More info on other names for the same constellation on the wikipedia page The Big Dipper. Funny how the page is named for the name given by white north Americans as opposed to anyone else who has given it a name.

G[r]eek Alphabet : R is for R2D2!!!!!!!!!!!!!!!!!

Certain characters get a lot of love when I post them. At some point I will do a grid of how many facebook likes I get per character and time of day posted.Yes I am that obsessive.

ANYway. People seem to like R2, I know I do and so does my Mum.

Sometimes I run into a problem because I tend to only think a few stages ahead. I had carefully gone to look up the colours of R2's accoutrements and I realised he had a grey head. At first I was like whatever! I'll just embroider it in later, then I started on the head and I kind of liked it in white and I was starting to go off the idea of embroidering the grey. I asked for a few opinions, and everyone was very sweet about the fact that I'd got the colour wrong.

R for R2D2 early stages with just head and R embroidered
Then later I had this idea...laundry pens, ink designed to be washed and be permanent. I tested the pen on the back of one of the feet where it wouldn't matter aaaaaaaaand hey presto! Grey head for R2.

R is for R2D2 completed.

The patterning is semi made up based on a picture I don't know if I posted previously
How to guide to drawing R2D2

I also revisited nostalgia with the following pic
C3P0 and R2D2 on set

G[r]eek Alphabet : Q is for Queens

It's a busy day today - I gots 3 updates for you for the letters Q, R and S. The end is nigh....or something. Actually I'm at 19 out of 30 so I guess I'm sort of 2/3 of the way I guess which is pretty cool.

I had decided on that purple from C for cat as the Q. This was not going to be my favourite thing on account of the pins. I decided to make use of the fact that the Q is broken by the figures in it to cover up the fact that I didn't have a piece of purple large enough to go round. I decided (I think my Mum might have hinted) that I would tack rather than pinning. This helped immensely.

Tacking is when you sew something loosely and don't knot the threads so you can remove it once you've done the real sewing. I did mine in contrasting colours so I wouldn't accidentally pin the tacking in place by sewing over it.

Tacking and pinning down the circle of the Q

I then got on to the figures. I immediately hit a snag - the figures are extremely small and despite my original ideas for the arms and seated position of the figures, I didn't think I could make them work in cloth. I had to simplify the shape to fit what I could achieve more easily in cloth.

Final "design" for Q for Queens. End result slightly differs - figures stand, not sit and have more simplified arms waving around like windmills.

It also helped cover up a gap I'd left in the wrong place for the new arrangement.

Early stage of sewing down the Queens for Q

I did consider leaving the faces blank but I didn't like it.

Q is for Queens (Red and White) complete

Why Queens?

There are two entertaining Queens in Alice through the looking glass :the Red and the White.

My favourite scene with the Red Queen is the one where Alice has become a Queen but can't eat anything because she keeps being introduced to the food.

My favourite scene for the White Queen (apart from the jam quote obviously) is the dreamlike riverboat sequence with the shop.

Saturday 21 September 2013

G[r]eek Alphabet : P is for Pomegranate and Persephone

I wasn't entirely convinced by this design when I came to make this one. It was neat but a bit quiet and uncomplex  after some of the designs I've made.

I did debate returning to my original plan with the pomegranate below the P and Persephone's dress as she runs away but I didn't like it. I didn't want to mess up the P and turn it into a B.

Original sketch for P for Pomegranate and Persephone - Persephone's skirt is all you can see as she runs off the page and the Pomegranate was below the P Final sketch for P for Pomegranate and Persephone - Pomegranate is in the bulge of the P and Persephone is only inferred not drawn at all

As always I dithered over the colour of the letter because I couldn't use a reddish colour due to the reds in the pomegranate and I didn't want too pale a colour. None of my blues seemed appropriate either.

This photo is one I took to be able to think more on the colour of the letter while at work creating Odin.

Green backing cloth of the P letter with some white and pink - photo to use to asses possible colour combinations

The problem with the green I decided to use is it is technically for putting curtain hooks on curtains which means it's thick and lumpy and twice the width I wanted meaning I had to double it over to use it. I sewed the ribbon for the outside of the pomegranate to the inside flesh colour fabric and then sewed the P down quite fast as I couldn't use pins very easily on such a thick wedge of material.

P for Pomegranate - P sewn down and Pomegranate begun

So then I was on to the seeds and the spaces where seeds had been. It worked out quite well that this was going to be done over the top in embroidery because I hadn't managed to keep the white very flat while sewing down the P. I only have so many fingers. I had decided that the seeds would be made out of large decorative knots and the spaces of where seeds used to be would be small sewn stitches in circles.

P for Pomegranate - making the seeds with knotted thread

I was worried that the knots would take a long time and had doubled up the thread to make extra quick large knots. It meant I went through thread fast but the knots actually went pretty quickly as did the empty places where seeds had been.


 The final design decision was to add an extra bit of pink around the end of the P to add some definition to the letter.

Mythology spot


So what has a pomegranate got to do with Persephone? This is a classic abduction story from Greek mythology. Hades kidnaps Persephone and makes her his Queen. Her mother Demeter hunts for him and begs Zeus to get her daughter back. Persephone pines for the above world and refuses to eat anything in the underworld. When Zeus intervenes to get her back Hades says she can go back if she hasn't eaten anything....Persephone says she hasn't but the gardener says she has - she has eaten half the seeds of a pomegranate. However Hades still lets her go back but only for half the year. Or something along those lines. Thus the seasons are born. It's summer and spring when she comes above ground and autumn and winter when she is in the underworld as Demeter - a harvest goddess is sad.

Other fun Persephone facts - in some source(s) she is said to be the creator of human life instead of Prometheus, and sometimes she is said not to be Demeter's daughter but Zeus and Styx (the River that takes you to the underworld).

All this and more from the Theoi article on Persephone : Greek queen of the underworld and spring

Crazy factoid about me and Pomegranates


I had never eaten pomegranate until about 5 years ago. As a child I read this myth and wondered why she was eating the seeds and not the fruit. Having eaten one, mystery solved! That's what you eat in a pomegranate!!
photo of a pomegranate partially peeled to show some seeds

G[r]eek Alphabet : O is for Odin

Odin is one of only 3 characters from northern or Norse mythology in the alphabet. He's quite simple with not a lot in the design to signify who he is. A friend of mine who is Asian and not UK born saw it and thought it was Jesus because of the beard which amused me. I have debated adding a raven but I really like the background fabric I chose and it's a tough one to sew through being a fake kind of leather thing.

I have a couple of photos but I think I will just share the final product because there isn't much to see in the others that's much different.

My main craft choice was that because the backing fabric is so tough, I would do as much sewing as I could before I attached the design to it. This meant I sewed Odin's beard and hair to his face and sewed his face to the O before I attached it to the base fabric. This is, as you have seen, mostly not how I do things.
O is for Odin complete

At one stage I was going to make Odin's hair fill the inside of the O but I changed my mind. I kind of like it better this way.

A last minute decision that may not be so visible on camera is that having made Odin slightly bumpy I decided to fill him out a bit and make his face 3D. It's fun little detail when you look at it with your eye and fingers.

Mythology spot

Why then, does Odin only have one eye you ask? Funny you should ask that, well Odin gave up his eye in exchange for the chance to gain wisdom by drinking from a well beneath Yggdrasil, the world tree.

For a fuller description see Norse Mythology - Why Odin is One-Eyed - not a bad site considering I found it by just googling right now. It cites primary sources, even if it doesn't link to online translations of those primary sources. Props though to Dan McCoy for a very scholarly site.

This little corner is something I may well go back and retroactively add to other posts!

G[r]eek Alphabet : N is for Narcissus

I am currently a bit behind on blog posts as I'm now about to start on Q, but that means you get lots of posts all in one go! Lucky lucky you ;-)

As I started this one I was a little concerned. I was adding a design onto a busy patterned cloth and I didn't want the main design to be overwhelmed by that and I didn't want to change the background. I spent some time choosing the right colours as always and although I really wanted to use ribbon for the reduced hassle the right colour for the letter was dark blue so that meant a lot of pinning

I also slightly simplified the leaves because both the letter and the green which was to overlap the letter required lots and lost of pins. The upside I guess of lots of pins is that I'm in a desperate hurry to get rid of them, so I sew quite fast.

This is the half way stage.

N for Narcissus (as a daffodil) in progress, N part sewn down, flower's leaf and stalk being sewn down


Because I was so fed up of pins by this point I decided not to use a cloth needing hemming for the daffodil as having pinned everything including the pond I'd had enough! I did make the trumpet slightly 3 D by using a loop of ribbon and not sewing all of the front part down.

N for Narcissus completed

I think that's all I can say really!!

To keep you going on this one, I link you to the fabulous Theoi Library site (one of my new favourite sites for Greek Myth info) and to Ovid's Metamorphoses Book 3 for the myth of Echo and Narcissus - the man who fell in love with his own reflection.

Extra fun linky - a Geek and Sundry vlogger Dael Kingsmill talks about the Narcissus myth

Sunday 15 September 2013

G[r]eek Alphabet : M is for Medusa

The first thing that happened when I started making this one was I felt that although I liked my design as a drawing I was not looking forward to making or embroidering the snakes so small and so many.
 
So I decided I needed to make her head larger so the snakes could be larger and easier and played with how this would work.
Initial re-sketch test of M for Medusa. Only has her head, V of the M comes down over her forehead

With this first test sketch I was hoping it would have more of a Scarlet Witch type effect. Like this image:
Headshot pic of Scarlet Witch
But it didn't entirely work with the v of the M hitting Medusa's head.

So then I thought of bringing her head down further.
Initial re-sketch test of M for Medusa. Only has her head, filling the lower section. Hair spirallish inspired by ancient Greek pottery depictions

The hair and style is influenced by ancient Greek Pottery designs of Medusa. A Medusa Gorgon head on ancient Greek pottery. She sticks out her tongue and her snakes are in little coils all around her head. She has fangs

So then I thought I better make her a little smaller and thought I'd bring her to one side like Athena in A or Heracles in H.
M for Medusa, Medusa is to one side and is torso and head. Hair partly obscures part of the M

This brought in a new issue - what was I going to do with her snake hair so that it doesn't obscure the M too much? At first I thought the hair might be OK if the M was strong enough.
I started colour testing it with a strong red coloured letter M and making her hair go different ways.
M for Medusa, colour sketch. Medusa is to one side and is torso and head. Seeing how I can arrange the hair to keep the letter M clear and easy to read. Here it is part obscured by hair and part not

This final sketch made it clear to me that most of the hair would have to be behind the M.
M for Medusa, colour sketch. Medusa is to one side and is torso and head. Seeing how I can arrange the hair to keep the letter M clear and easy to read. Here all the hair is behind the letter M.

Then it was back to materials. I had chosen this funky fun stretchy cord that was shiny but it was also quite pale and the background cloth was pale yellow, so I went back to option 2 - green felt as I couldn't face hemming up all the snakes.

I did debate making her darker but I was already a bit edgy that the one bad person (or nasty character) on the alphabet was a woman, I didn't fancy making the one black woman in the selection a monster. I had some additional debates about including such a scary character as well at all at this point but decided kids like a few monsters. I was also cheered by finding on a funky classics website that in some versions Medusa is just born a monster rather than a punishment for pride and beauty! See Theoi : Medusa and the Gorgons which includes translated primary source literary references.

After that it was pretty simple to make being mainly ribbon and felt.
M for Medusa with the ribbon and felt pinned in place

M for Medusa with main sewing down of ribbon and felt, plus the face embroidered. No dress yet.

When I came to pin down the dress/top I was getting fed up with the way the pins buckle the fabric when you are using such a small piece. I used a technique that would normally only be used to pin things in place on a cushion - see below pins like studs
Pinning down Medusa's top - pinned straight front to back to make pinning flatter. Looks like "studs" from the front
 From the back you can see the pins look like a hedgehog but they were very easy to avoid and sewing went quickly meaning you could get rid of them pretty quickly.
Pinning down Medusa's top - pinned straight front to back to make pinning flatter. Looks like a hedgehog from the back!
 So there we go! She's done! I may add in some shoulder brooches. I haven't decided at this point. I rather like her. Specially the eyes and forked tongues on the snakes.
I even looked up whether snakes have pink tongues - some certainly seem to!

Real phonto of a snake with forked tongue sticking out - pink tongue

Saturday 14 September 2013

G[r]eek Alphabet - general progress

So I have this photo collage app on my phone which I've been using to look at how the letters will go together. It leaves a white border space that I think will not be possible at the end due to some slight measurement miscalculations on my part (whoops!).

So this is all the letters done so far.


The app I use (PicsArt) allows me to do 1 row of 4 or 2 rows of 4 but not 3 rows of 4 so this is a manual combination of 3 images via PowerPoint.

Obviously the lighting is different in each one depending on the time of day, where I took it, and the colour has varied depending on what was the general colour around it, but it's a nice satisfying feeling to see them all laid out together and not looking too awful. There are inevitably a lot of colours but so far there haven't been any extreme clashes.

I think back to my original basic colour cloth choices and I'm thinking about what will be in the next row near that dark blue corner of K and L. Underneath will be O for Odin with some browns pinks and greys, but also P for Pomegranate with a light green base colour. Lower down will be S for stars on black, T for Tardis with some dark navy blue. So that should be OK.

Basic cloth colours for each square laid out roughly in place to consider contrast and clashes etc
After that still remains debatable. This colour plan accidentally missed out V. So I still have to work that one out. I may have 2 rows of 3 at the end. Not sure yet.

Obsessing over numbers as I redesign M.

If I stick to current designs I have 6 women and 7 men.  Of those figures, 5 women and 5 men are full figures head to toe (ish).  There are 2 men who are only part of a person - 1 face, 1 head and torso, and 1 woman head and torso.

Thinking of Bechdel test, almost all the men and women have names....one man doesn't have anything but his group(the feegle) and three people just have their title (the red and white Queens and the Count). All of them are static.

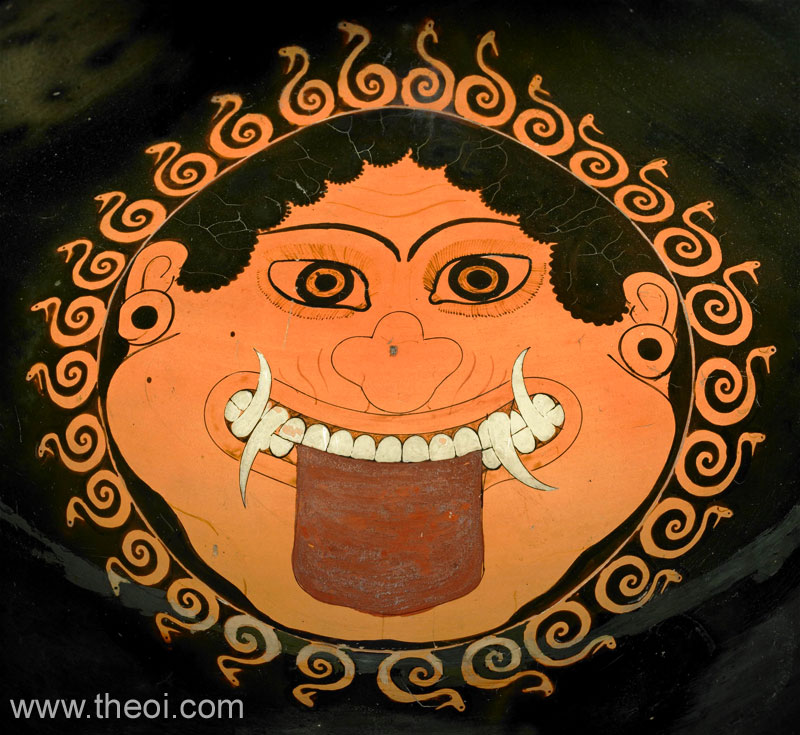
3 of the women are warriors (Xena, Wonder Woman, Athena) , 2 of the men (Heracles, and I think, Odin). One of the men is a cocky idiot(Icarus) and another a slacker (Zaphod), but only one of the women is monstrous (Medusa) and superscary. And I guess you could say 2 people are known for their brains (Athena and Odin).

We have various indeterminate gender scaries, people style animals and robots that often get a masculine pronoun (a ghost, Big Bird, Dalek, R2D2).

I think it's a nice mix.

G[r]eek Alphabet : L is for Luggage

Hello! Another letter finished and in double quick time. this was a fiddly one because of the extra surprise, but I guess it was a relatively simple design in other terms. The shapes were also mostly quite blocky which helps.


First thing was I had decided to use the fake brown leather for the luggage but I was starting to wonder if it was contrasting enough. The colours all go together but the luggage has disappeared into the background. I'm sad because I liked the idea of the leather for the luggage.

Colour test for fabrics for L for luggage purple background pale pink L, brown fake leather for luggage (darker)

So I tried another brown fabric which was slightly lighter. This worked better.


I spent some time debating the feet colour due to having chosen pink ribbon for the L and wanting a contrast with that and the background, and I ended up going with a strong yellow.

Decisions made, the purple base fabric needed sewing together as it wasn't quite big enough a remnant. Then I jumped right into the most interesting bit, the lid of the luggage which (surprise! - ish) I had decided to make so it opened and closed and had a big fat tongue in the middle rather than hanging out like in my reference picture:

luggage fan art with teeth around edge and a big tongue 

I made the lid separately to get the lining and the outside hemmed to each other and also made the tongue out of a small bit of red ribbon separately. I then sewed down the lid, sewed in the tongue and sewed down the bottom half of the luggage. I really liked how it turned out.

Letter L - Luggage main body part done including lid (closed)

Letter L - Luggage main body part done including lid open showing gold inside and red tongue

Then all that was left was sewing don the L and defining the legs a bit with purple and yellow embroidery thread.

L is for luggage (Terry Pratchett Discworld) complete - lid closed

L is for luggage (Terry Pratchett's Discworld) - lid open showing the red tongue

The lid does not stay closed without pins so I'm still debating adding in a snap or hook but for now I'm leaving it as it is. Yay! That was fun.
Moving on to M for Medusa I'm thinking of doing a bit of a redesign but I'm having a think first. Can't believe I'm up to row 4 already!!

Friday 13 September 2013

G[r]eek Alphabet : K is for KRAKEN!

So at some point  recently I got fed up of having to constantly hunt for the same images repeatedly as references during this project and I got a Pinterest account.

It's really handy right now when I want to tell you what images I was using as colour and design references while making the Kraken image. I am slightly mystified by the few friends on there that I follow constantly repinning pictures of food but it's all good really.

Anyway, the basic colour of the square was a dark streaky blue and I'd decided on a high contrast white ribbon for the letter.

I had a vague idea about pink for the kraken as it seemed somewhat octopus or squid like colour to use. The googled images I ended up saving for reference were :

Pink angry looking squid-like kraken picture
Victorian or Victorian looking print with a squid-like kraken in a pinky colour pulling over a ship by its masts
Black and white Victorian looking picture of a kraken with only its legs visible above water holding a ship aloft

I had decided to do the kraken limbs using embroidery and I was originally planning to do them very simply just in perhaps varying tones of pink with a bit of purple to separate them out and differentiate.
K for Kraken early stages - white ribbon k is sewn down and starting to outline the kraken's tentacles

I had done most of the tentacles when I started to feel just a bit of purple to outline was not enough and the tentacles were looking a bit like weird worms rather than kraken tentacles. I had also just used varying shade and some very light purple as outline in places so I added more darker purple over the top to create definition

I also went back to the reference images to think about adding suckers. They seem to make the undersides and suckers lighter but I wanted something more visible and contrasting so I found a dark pink that I thought would work. I'm a little nervous about them but I think they look good.

Finally just to give a small touch of water I added a few wavy vees.

completed K for Kraken

Although I love how this has turned out, because the more embroidery you do the harder it is to add on more over the top, and because an amazing friend had given me a ton of ribbon, I did wish afterwards that I had used cloth or ribbon for the tentacles as it would have been so much easier but as it came out so well I don't really mind! Looking forward to L which is a rather simple design with a little twist I'm planning.