Sunday, 26 April 2020

Open the door - let them in - Page 3


Page 3 - Tardis with opening doors - doors closed
This blog is so delayed. Anyway, Page 3 is the Tardis.
One of the things I should mention is the background fabric. Not being blessed with endless yardage of the same background colours I attempted as best I could to mix up the different background fabrics and to not bunch it up too much. I also wanted to make sure I had enough of darker night time-y colours for pages where they should be night time-y.
This one has a shiny black fabric (satin?), contrasting the dark blue velvet of the doll pocket and the front page.
Page 3 - Tardis with opening doors - doors are open to show 11's console inside
Making the Tardis out of cloth gave me room to do things like make the backs of the doors white - a detail I had never noticed before - also to have slightly transparenty windows. I think there's a little cardboard in the doors to help stiffen them slightly.

The largest alteration I made to the original pattern is that the original pattern does not specify what is behind the doors. I chose this console which I think is 11's (Matt Smith). I don't think I had a reason, I just felt like it. I did toy with doing some kind of swirl of light like when Rose opens the Tardis to save people but I rather like how the console has come out.

A detail that despite it being in the instructions that I messed up is the sign - Police Box. You can see from the two pictures that originally I got it wrong and put black writing on white - a version I did find pics of but nothing definitive, and when I realised mostly it's white writing on black I had to go back and change it.

Monday, 6 April 2020

Friends and past selves...page 2 or inner cover

Two plush Doctors from Doctor Who - 13th Doctor (character played by Jodie Whittaker) and 5th Doctor (played by Peter Davison)
One of the optional parts of the book was the doll pocket and the dolls themselves. I think I did these quite late in the day and I kind of caved because I'd made lots of plushies before as you can see on this blog.

There was another pattern I could have bought for them, but I decided to free style.

This was not exactly wise as you may be able to see from the pair of them together. The newest doctor is fatter and larger than the fifth Doctor, because I'd had such a terrible time turning him right side out that I increased the pattern.

Construction pic showing putting together 5th Doctor (Peter Davison) from Doctor Who - you can see the pattern, some embroidery thread and the two sides of the doll waiting to be sewn togetherCompleted 5th Doctor (Peter Davison) from Doctor Who with celery stick
For those of you who don't know how I do that, I made a pattern and design, and then put together each site of the doll.

I then sew it together right side to right side, then turn inside out and stuff.

If you make the arms too thin, you spend a very slow time trying to get them the right way out, panicking that you will push too hard and make a hole in the fabric.

This is particularly bad if there is a thickened area, like where the hands meet the sleeves.
I survived, if with slightly wonky arms, and narrowly escaped forgetting his lovely celery stick thanks to an observant friend who saw my posted photos.

I haven't got a separate image of the pocket space the dolls are sitting in, but it was a rescue of a piece of fabric I accidentally melted, because me, and I rather like it. It reminds me of the rip in dimensions in one of the 11th Doctor episodes.
Completed 13th Doctor (Jodie Whittaker) without her coatCompleted plushie of the 13th Doctor (Jodie Whittaker) complete with coat
Obviously it was a lot easier to make 13 as she was a larger pattern all round.

I don't always make any of the clothes separately and removable, but often longer coats or jackets do get made separately, and I think in this case the lining goes all the way up the back piece, if not into the arms.

Some details in either doll do simply have to be left out because I can't make things that small but I loved adding in the earring and braces.

Sunday, 20 October 2019

The Doctor is very very late

So in about 2012, a friend was going on about the Doctor Who Quiet Book. Well we all were, it was really cool. I was reading The Mary Sue A LOT back then and they had an article all about it (Doctor Who Quiet Book Mary Sue article). She wished someone would make it. I wasn't really into sewing much back then but I said I would do something smaller and she found a Doctor Who Plushie. This lead to a lot of  other plushies, which really opened the gateway to a lot of much large projects which you can find on this blog.

Fast foward to now, I've made a lot of large projects, my friend has a new baby and I'm like "I could totally make that book she wanted. It would be easy!". To my delight the pattern was still listed on Etsy, although the woman had changed her online name from Bantam BB to SpaceBat Designs (pattern for Doctor Who Quiet book on Etsy). And I mean it was 9 quid, why wouldn't I?

As I write, I've finished all 12 pages, and overall, it's been very quick really despite the fact that I only finished the previous project in June and I'd not even used much felt. I think what sped things up was that I'm only lightly tinkering with the pattern, and the patterns are larger than some of my previous projects. With my own projects I have to make a lot more decisions than just what fabric or materials am I using. It's been a lot of fun.

The Cover

Back of the fabric showing the interfacing ironed on the reverse with the detail of the design drawn on. The fabric is stretched over an embroidery hoop. The fabric is tatty on one side - melted from an overly hot iron
So on to the cover page. The first choice I made was I was going to embroider on the title of the book rather than cut out felt letters or other fabric. I also decided that I would use the font and colour scheme of the newest Doctor. To do this, I found a picture online and traced it onto the interfacing, then retraced it backwards. I'd planned out my backing fabrics and the cover was set to be blue velvet. I got a bit overexcited and melted it a bit on the edges. I'm not very good at remembering past mistakes as this was not my first time slightly melting this fabric.
The embroidery for the lettering I used was the graded colour kind between a pale yellow and an orangey colour. I ran out with a tiny bit to go, but managed to colour match. Essentially it was fairly easy.
Starting to embroider the title page lettering - so far only the letters "D" and "O" are showing with my hand for scale. The fabric is dark blue velvet stretched over a wooden embroidery hoop
The tiny tardis was a bit harder without some actual blue felt, I was using a navy cotton I had lots of, but being small, it didn't take long.

To finish off the design and make it look more like space, I foolishly decided to try and use up some more of this awful embroidery thread that has gold coloured metal wrapped around it, which is hell on earth to sew with, but all in all for a few stars it was fine!
Finished cover of The Doctor Who Quiet Book showing the title and tiny embroidered tardis all on dark blue velvet

Monday, 16 September 2019

Guide to Advent Calendar with links

It's over and done, but for anyone who wants the full list, here it is

1. Annunciation - Mary has her pregnancy foretold by Angel Gabriel - large scene ( First Sunday)
2. Joseph is warned by an angel not to divorce Mary - large scene
3. Visitation - Mary visits her cousin Elizabeth, pregnant with John the Baptist - large scene
4.  Census document - Mary and Joseph must travel to Bethlehem to participate in the census - small scene
5. A suitcase represents preparation for the journey - small scene
6. Crossed keys represents things you take on a journey, and the keys to heaven of St Peter, head of the first church - small scene
7. Mary and Joseph begin their journey - large scene

8. John the Baptist and and Isaiah predict Jesus coming "make straight the way of the Lord" - large scene - large scene (Second Sunday)
9. Parable of the pearl without price (Matthew 13:45-46) - small scene
10. Priscilla and Aquila, key figures in the early church- large scene
11. The whale that swallowed the prophet Jonah - small scene
12. Noah's Ark - large scene
13. Deborah - prophet and leader in the old testament - large scene
14. Joseph and Mary stop at an oasis on their journey - large scene


15. Wise men watch the star in the east - large scene (Third Sunday)
16. Adam and Eve - large scene
17.  Miracle of the loaves and fishes - small scene
18. Abraham and Sarah - descendants numbered like the stars - large scene
19. Moses as a baby in the reeds - small scene
20. Vine - small scene
21.  No room at the inn - large scene

22. Angels visit the shepherds to announce Jesus birth - large scene (Fourth and final Sunday)
23. Gifts of the magi - gold frankincense and myrrh - small scene
24. Star above the place where Jesus was born - small scene
Nativity scene - individual parts make up a picture
25. Donkey
26. Ox
27. Joseph
28. Mary
29. Jesus

Parts 24 to 29? How long IS Christmas?

And here again we come back to the key point I wanted in my advent calendar. Advent or preparation time for Christmas is what you make of it and the choices you choose to make as a family or community, but the religious festival of preparation that is Lent is one of the Christian calendar's varying dates.
When Lent and Easter fall varies within parameters related to the moon but Lent is always the same length of time.

Christmas is always 25 December, but Advent varies in length and start date related to the day of the week on which Christmas falls. Advent is 4 Sundays before Christmas. Some of you may be old enough to remember Blue Peter making an advent wreath with 4 candles.

"Scene" 24 is the comet shaped star in the east. It's shiny and removable so you add it on when you hit 24.
What does this mean? If Christmas falls on a Sunday, that's a full extra week of Advent, and the first day of Advent could be in November.  But if Christmas falls on a Monday, Advent is cut short - it's only 23 days.

So how do you manage that on an advent calendar without continually making a new one? I decided to build in some flexibility which would allow people to both follow the religious way of doing things, or to stick with the commercial generally followed way of doing things. I made each element of the final nativity scene something you could add on individually, or, if you choose you could add them on all together.

So "scene" 24 is the star in the east.
Except as you can see, it's not a star, it's a comet.
Some people have thought that the star seen by the wise men was Haley's Comet and I chose to show it like that, partly in honour of my brother who is an Astronomer and studied Comet like stars!

As you add on the star for 24, you need to know where - so this is the outline with the number 24 in it, which matches the 24 on the back of the star
There's no covering leaf here because you add these elements on, much like Mary and Joseph on the donkey earlier.

So how do you know where it goes? Instead of a leaf, you've got an outline behind. and on the back of the star is the number to match up.

For the star on the light background the outline is in black.

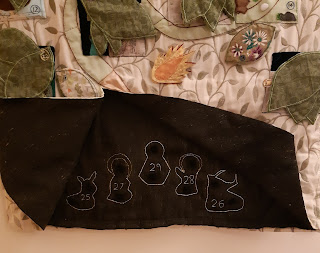
The final "scenes" 25 to 29 are the individual parts of the nativity scene.

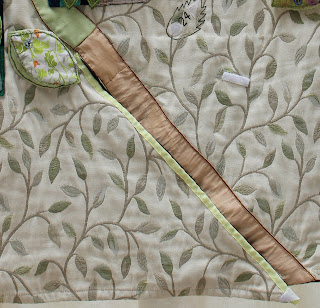
I wanted there to be a sense of a big reveal to this section, so I decided that there should be a much larger "door" or "flaps" that should open out to reveal the area for the nativity. Having used the road structure through the advent calendar, it made a really useful place to make the flap for the hidden place. Once I'd planned for the flaps I decided to make the hidden area dark grey - to give the feel of a dark cave or stable.
Lower area of the advent calendar, looks fairly plain with the road in the middle which marks the edge of the area that opens up for the nativityThe two flaps opened up showing the outlines for the "scenes" or rather figures for 25 to 29 which are the parts of the nativity scene
As this area is dark the outlines to add the figures to are white - with gold for the halo edging for Joseph, Mary and Jesus.

The figures are added on in order of importance, ending with the most important!
25 and 26 are the donkey and the ox that are frequently added to nativity scenes.
27 and 28 are Joseph and Mary, and 29 is Jesus.
So if you want to play it safe and only have 25 days every year, you can add on the whole scene for Christmas day every year.

BUT you have started with Advent Sundays and it varies, on a short year 24-29 are added on all together, and if it's a long year, you can add on each element one by one. And in between you can just add the last few on together varyingly.

The last feature is somewhere to hold all the loose parts - there are pockets on the back to hold the leaves and the different bits that come away. Sadly I don't have a picture.

And with that, my posts are all complete! Good news though - I've another project to catch you up on...it's a lot more nerdy.

Friday, 6 September 2019

Step back, step forward, more nativity scenes - 15, 21, 22, 23

Although I concentrated quite a few of the Christmas related scenes in the first week, I didn't want to bunch the rest of them up too much and I also wanted to kind of keep coming back to the nativity each Sunday. The problem was that some of the scenes were really part of the final nativity scene or technically just after it, when the calendar is over with.  I'd already made my calendar 25-29 days because it is based on the 4 Sundays of Advent, not the calendar month of dates.

I did think of extending the calendar even further to include these scenes but I was struggling enough with 29! I decided there would be some foreshadowing and some would be towards the end.

I decided there had to be a Christmas link to all 4 Sundays. Hence Mary and her Angel for scene 1, John's call for Jesus' coming at 8, and then further scenes at 15 and 22.

Scene 15 : The Wise men and wise woman study the star to plan their journey. Background is a map designThe easy one to move a little earlier was number 15 - the wise men (and women?).

Obviously they would have been studying the "star" before they started travelling so they could be moved further up the sequence, and depicted in that part of their story. I made sure that their scene would look directly at the star, which was also going to be in the picture as a later stage. Hence the telescope does not look up into the sky.

More map fabric here - I mean it's amazing stuff, and they are planning a journey so why not?

I decided I would try and make one of the figures a woman because why not?  Also stolen from a friend who made me a nativity set from clay with a female wise person.
I also deliberately decided that they would be darker looking people, as tradition says they visited Jesus from Africa, and were definitely from West of Israel.

Scene 21 : The (female) innkeeper bars Joseph and Mary from the Inn (depicted with map fabric as a travellers' place of rest)Just before the final sequence I placed a scene for "no room at the inn" (21).

Here too as I mentioned I decided the innkeeper could be a woman.

I also made use of a map fabric scrap again, to emphasise the inn as a place for travelers and the end of the journey. I like that a negative scene also was not highlighted in a Sunday, which was less deliberate than it was pushed aside for a more interesting scene after.


Scene 22 : The angels tell the shepherds that Jesus is born

For  scene 22 I decided I would just have to have the shepherds being sung to early as there was no way to make them have an earlier scene. The angels don't say "Jesus will  be born soon", they say he is born. But I decided 22 was near enough.

Similarly with 23, I decided it's not really a surprise what the gifts of the wise men were, so I just put them as near to the end as possible. They are shown as what they are or represent - gold for kingship, (frank)incense for divinity, myrrh (for his sacrificial death).
Mini Scene 23 : The gifts of the magic transformed into what they represent Crown (gold), Incense for worship (Frankincense), Jar of Myrrh (anointing of the dead)


Tuesday, 3 September 2019

Some more randoms - 17 & 20


Loaves and fishes, an unispired design

I guess I could have added this to the random collection post earlier but I didn't want it to go on forever. I suppose the miracle of the loaves and fishes and the image of the vine are both linked into the idea of the central part of many Christian services - communion, but they were mainly chosen as familiar images and stories that I felt an interest in recreating.

If you'll permit me to be harsh on myself, I would say scene 17 - the loaves and fishes is possibly the weakest of all my designs. It's not super interesting or clever, it simply is some loaves and fishes.

Scene 20 - blue grapes and vine leaves embroidered against a red velvet backgroundScene 20 - the vine on the other hand is very simple but I just think it came out rather beautifully, specially as, like the pearl without price (scene 9), it was kind of made up to fill a gap sort of late in the day.

One of the things I have enjoyed about the smaller scenes was finding and using as many different leafy, planty related fabric scraps as i could find in my stashes. However, I did get to scene 20 and start worrying that I didn't have any more.

Leaf 20 - made of scraps of fabric cut to hide flamingos and focus on leaves
This wasn't strictly true, I did have another leafy fabric, but it had flamingos on it.

So I stitched together two bits to hide the flamingos and I had my last small leaf!