Saturday, 9 April 2016

And just like that, it's over...

Once all the pages were complete bar the cover, I took the whole lot to my Mum's because I don't own a sewing machine and I don't want one. She kindly sewed round three sides of the pairs of pages, which I then turned right side out and sewed together in groups so they would line up. While she did her sewing machining I did the final touches on the cover, which she then kindly sewing machined round as well.

Early stages of compiling the book - two sets of pages are grouped and sewn and the cover is ready to be attached


I then sewed the groups together giving me the central pages. Finally I sewed on the cover.
Final book - Kindergebet = Children's prayer

The title says "Kindergebet" or Children's prayer.

Finished book - open to page 1 - happily ever after!

Friday, 8 April 2016

Page 8 - Ribbons and hearts

This last page has one of the simplest designs of the whole book both in terms of the details, but in terms of the shapes being large and easy to appliqué... well mostly. I had a debate about whether to cut out and hem down the shape of the ribbons or use actual ribbon. In the end I decided I would use actual ribbon. Folding the ribbon and pinning it in place to the right shape is fiddly but not so annoying as hemming curving shapes can sometimes be.

The design of the cross is based on the Dehonian cross I first saw when I went to World Youth Day in Madrid with a Dehonian group.

I had fun creating a wooden pattern on the cross. before adding on the heart.
Page 8 - Most of the design and embroidery complete, just some of the writing to finish

Once I added the writing in white, I felt like the writing didn't stand out enough. so I decided to add shading in black.
Page 8 - more or less complete, adding on dark shading to lettering

With that the design was done.
Page 8 - Das hat mir der liebe Gott gegeben = That's what my dear God has given me
Now all that's left is the cover!

Page 7 - family affair

Unlike page 5 which was very much intended as a portrait, this page was only sort of a portrait in my mind, but ultimately that's what drove the decision making. It is a sort of family portrait, this mean that despite my design having the mother figure with a fringe, that disappeared during execution.
I also made an effort to change the face shapes to be a little more similar. The children are less portrait attempts as attempts to make children look like children.

From page to cloth also varies other aspects. In a line drawing in pencil you can get away with a general sketched shape for the combined bodies of both parents, but once you put down the appliqué it made the two parents look a little odd - not just huge but wrong shaped blob combined body.

Early stage of page 7 - applique done and some of the embroidery in progress
So I redrew the bodies of both parents on the reverse and then filled in the bit in between with embroidery. I also found that having them top to toe in one colour blue just looked odd. So I chose some darker colours for the trousers and filled these in with embroidery as well.
Page 7 with further details embroidered including facial features and hair.
I did debate putting the upper words onto a second ribbon but due to the transparency of the fabric the ribbon would have had to cover the original word placing which wasn't what I wanted to do so I stuck to the original design.

Page 7 final design: Vater und mutter, lust and leben = Father and mother, love and enthusiasm
The final decision was to add white shadowing to the upper letters to make them stand out about.

I'm not entirely convinced by the "Dad" haircut, but overall I rather like the design. and how it came out.


Sunday, 27 March 2016

Page 6 - or is it 7? Baby's a fashion model

The basic design of this page was taken from a similar sketch that inspired a page in my nephew's book. This was a sketch my mother had done of I think my little brother as a baby, asleep.


To make the page more interesting I had decided to make it interactive with different outfits which could be put together on the page. To do this I sewed in place the basic design - the word balloon and the child on the page and then added velcro to the child's top and bottom and feet to allow for tops, trousers/skirts and shoes.

The only slight hitch with the basics was the writing going slightly more off course than usual despite the design being there on the back to follow.

I also decided late in the day to add in the floating "e" because technically the words should read
"Ich habe kleider und auch schuhe" but they don't because schuh has to rhyme with "du" in the previous line.


Late stages of Page 6 - writing and child sewn down, changeable clothing in progress

Then I set to work on the clothes. Each piece of clothing had several layers - two of felt sandwiching a paper layer for stiffness, the ribbon sewn along one edge to make it a stronger attachment, and the velcro.

I sewed the velcro to the back first, then embroidered the front, then sewed the ribbon in place while sewing front and back together. The outfits were designed to go together in any combination, provided you are willing to mix dots and stripes.

Page 6 - "Ich Habe Kleider und auch shuhe" complete with alternate outfits
I confess having made one pair of shoes however, I lost interest and decided that I couldn't be bothered with an alternative pair.

However, having made the clothes I began to think about how to store them when they weren't attached and decided to add in a page on the back of page 6 with pockets for the outfits.

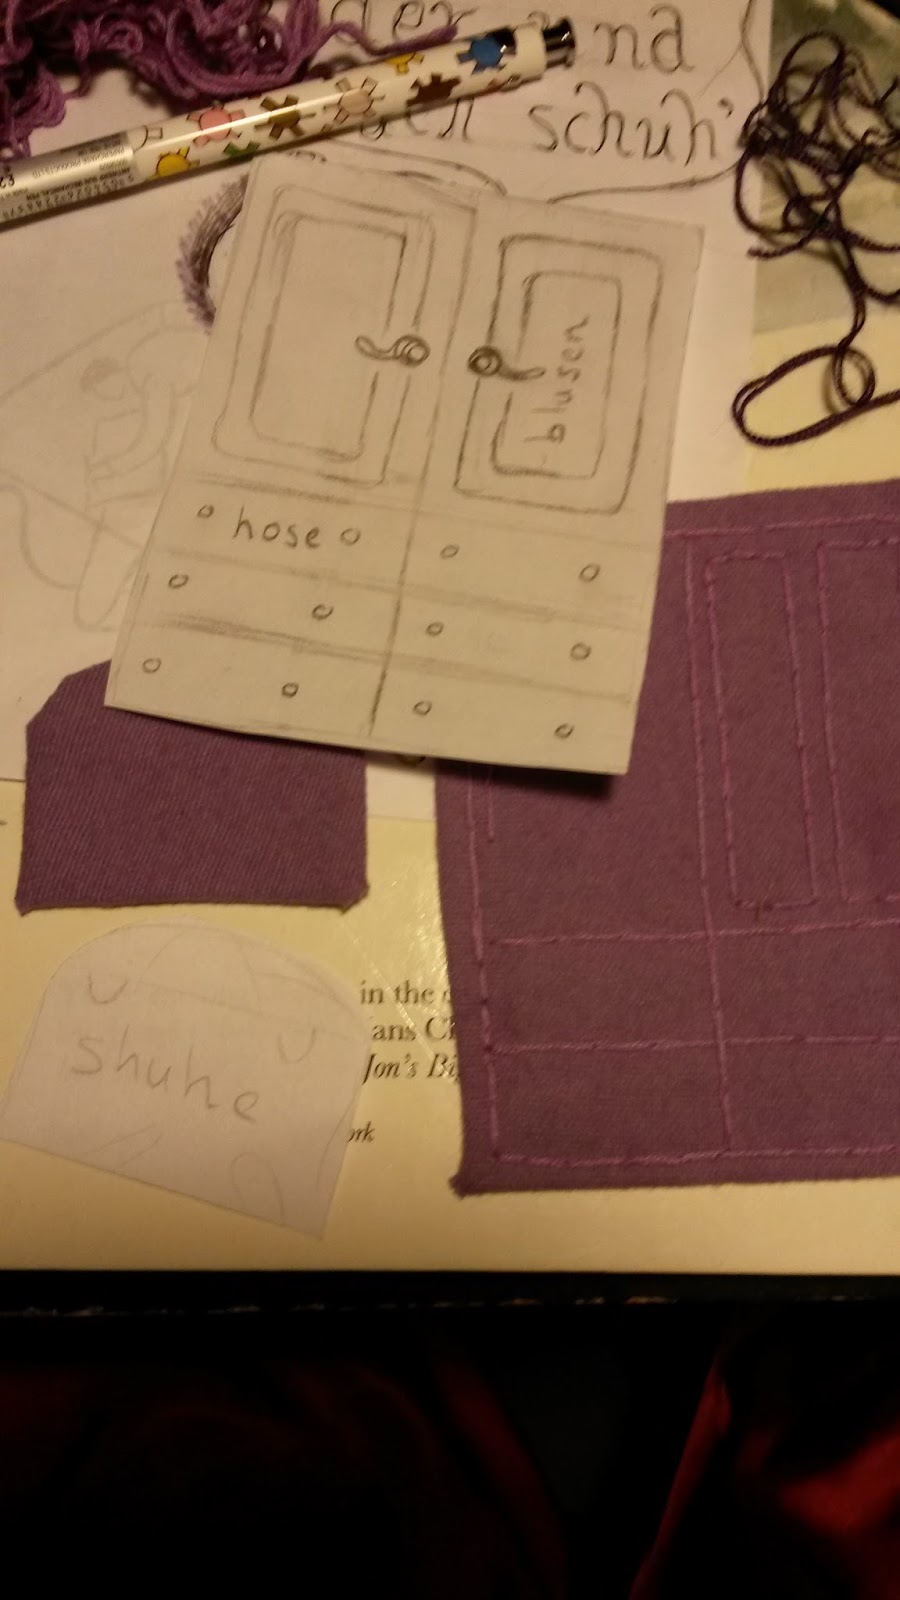
My idea for this page was

1. Furniture as theme for the pockets
2. Made of all the same fabric so as not to be too vibrant as this is not really a formal page, just a place to put the pockets.

One large pocket which should look like a wardrobe would be for the tops and trousers and skirt, a small "chest" for the shoes.


I mocked up a very simple design and then made the patches for the pockets


And carefully sewed down the ribbons for the clothes with enough ribbon to allow them to attach in the right places on the previous page.
The only thing I feel slightly bad about is that it says Schuhe, Blusen, Hose but not "rock" for skirt. I'm not sure I'm going back to add that on now though.

When I look at this purple page I hear the voice of Agent Carter, so I think I watched that a fair bit while making this. Not sure about the main page with the child on it.

Saturday, 30 January 2016

A guide to the making of a special present for a special girl

Due to the proliferation of posts about what is essentially one object in parts, here is a guide to all the stages.

In short, this is my second book made of cloth, based on a German nursery rhyme taught to me by my grandmother.

Page 5 - remembering things passed


At this point I started to think about the eventual compilation of all the pages and realised something I thought I'd planned for earlier - if I used the pages as is, pages 5 and 6 were going to be back to back.

This was not at all what I'd hoped for. My aim was for pages 5 and 6 to be a double page spread, with the Oma (grandma) on one page talking to the child on the opposite page who is responding to her question. I did not at all want for them to be back to back with each other.

I debated starting the first page of the story inside the front cover, but I didn't really like that as people don't tend to look there first for page 1.I decided I'd have a blank page on the back of page 1 which should pass semi unnoticed.

This particular page is important to me because it includes a sort of homage to my own Oma, because she was the one who taught me this nursery rhyme and because I love her.

Despite the fact the fabrics were not super stretchy for some reason  when I cut the speech bubble out and then pinned it on, it strangely shrunk. I'm not sure how obvious this is from the reverse.

It meant I shifted the writing slightly to fit in the smaller space. You can also see that the head of the Oma move slightly and the feet moved up although on the whole it is more or less in place as I planned.

You can also see that things have got kind of bumpy at the back. Again, not entirely sure how this happened except I probably should have put in more pins.

 However, from the front everything has worked out looking OK. You can see below that the page is a bit bumpy but looks fine. I had intended her whole chair to be applique but the fabric chosen was too thick to use for the arm of the chair on the right so I tidied up some of the details with embroidery instead.
 My Oma often sat in quite a high upright chair like this when I was growing up. I rather like how she came together.

When I sew I like to "watch" tv, by which I mean listen with some peripheral watching and occassional looking up. Podcasts also go down well. For this particular page, I did a lot of the sewing of the Oma while listening to the recorded google hangouts for Vaginal Fantasy Romance Book Club.

This records the last of catch up as I've barely started the next page. I have a few more making of pics to add in to the blog but there will be at least a brief interruption before [not very] regularly scheduled programming returns.

Page 4 - smell the flowers

This is perhaps one of the simplest concepts yet, I couldn't think of another way to play with the concept of butterfly wings except to make them flapping or above the page.

As a result I didn't take a lot of pictures of the progress.

Again fabric created the main complication. The wings are made from a stretchy fabric I think meant for swim suits. I used it on the cover of a previous book.

Another problem I'd not thought through was the fact that with a very pale yellow cotton sheet background, the design on the back would show through. Normally this wouldn't be an issue as it would be covered up by the appliqued fabric, but in this instance, I realised after making my butterfly that because the wings were free of the back, you'd be able to see the design underneath. I didn't really want this, so I chose a really low hassle solution - red felt, of which I have a lot due to not being able to buy in a small quantity.

I made a flower shape and sewed it over the design I wanted hidden and embroidered some petal edges to hide what remained visible of the design. The flower is actually slightly loose from the back fabric, having been sewn down in a circle near the centre but will lay flat on the page so should do a good job of covering up the design.

Completed page - "Das schmetterling bunte flugelein" - the butterfly has beautiful wings


I decided to put some padding in the wings which has given them a bit of a cuddly appearance but I'm quite happy with it all the same. Due to the fatness of the wings, I also ended up making the head and the end part of the body free from the cloth as it worked better that way.

On to the next page!