Tuesday, 16 July 2019

A pathway - scene 8

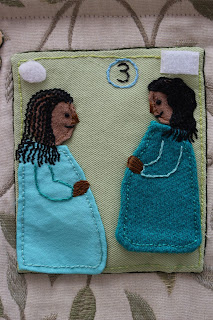
Scene 8 at first seems like one of my scattergun approach to inclusions of interesting bible stories, but the reading about St John the Baptist opens the gospel of Mark (Mark 1:1-8) and is one of the readings read in the run up to Christmas. The actual story is about preparing for the adult Jesus, but I guess it is read at this time of year because we are preparing for the arrival of the infant Jesus.

My depiction in a hair shirt in the desert is a classic depiction.

The reading itself  harks back to and specifically references an earlier prophecy in Isaiah (Isaiah 40:3). The key words for this scene is "make straight the way of the Lord".
As a result I decided the scene would extend beyond itself, with the path becoming straight and extending away from it.
To make reference to the (?)intertextuality - reference that also makes reference to another text, and to the idea of prophecy, I decided to make use of some beautiful fabric with writing on it. I tried to make sure I chose writing that was not super legible but was clearly writing. I also put some of it upside down.

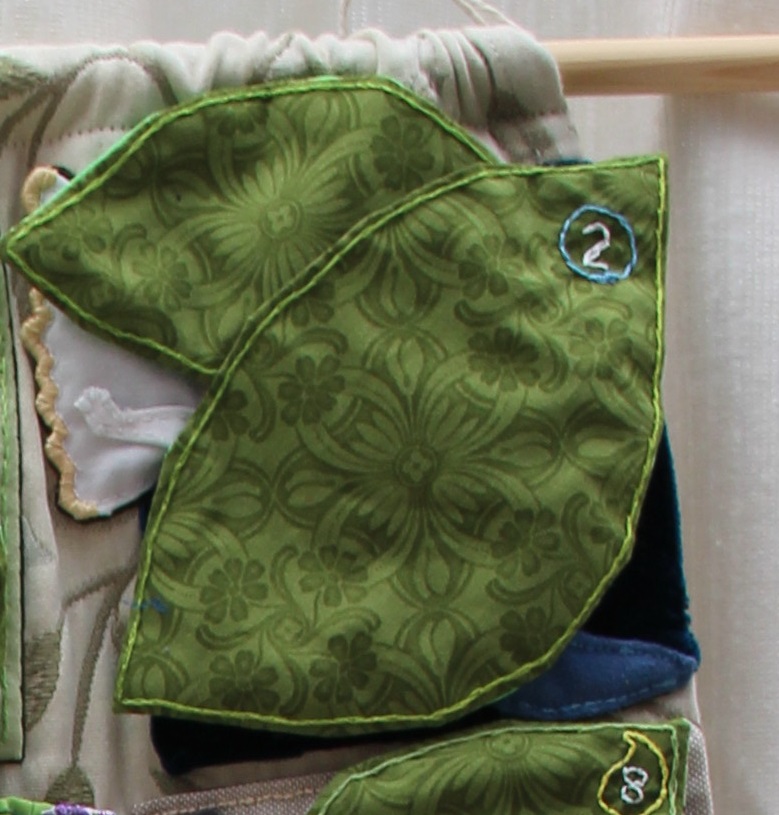
Another element to the design I added as a later feature when putting on the numbers, and you can see here, but also in scene 1, is a marker of the fact that this scene is a key point in the journey - a Sunday, the second Sunday of Advent. The number 8 is surrounded by the shape of a flame. 
Added to this I chose to colour code the numbers by weeks. So this first week was a light blue circle round the other numbers. If you go back to the posts about 2-7 you can see this.
Number 1 sewn in a flame shape on the leaf for scene 1 Number 2 sewn in a pale blue circle on the leaf for scene 2 Number 3 sewn in a pale blue circle on the leaf for scene 3 Number 5 sewn in a pale blue circle on the leaf for scene 5

Monday, 15 July 2019

The journey begins - Interactive elements - scene 7 & 14

Early in the planning I've mentioned I wanted to have as many places where the reveal would be parts of the actual nativity story. There aren't enough individual scenes to depict and at one stage I decided that perhaps I could have Joseph and pregnant Mary stopping several times along the way. I can't remember how many stops there were originally but in the end I only did two. This also gave a sort of structure to the design with a winding road going across the whole thing.

So scene 7 is a backdrop of the start of the journey to Bethlehem from Nazareth. I made use of some map fabric I had been given to add to the emphasis on journey and added some simple houses.
For the second rest stop I wanted it to link to the scene that would be next to it, where there would be a feature of a palm tree. It was meant to feel like a small oasis of green on a dusty road. In the photo below, the lady in red is from the scene 13 which we will come to later

The interactive element came from the figure of pregnant Mary on a donkey with Joseph.
This image also reflected back to a Hispanic (possibly just Mexican) advent tradition I really like: to have a statue of the pregnant Mary and Joseph is called "La Posada" - meaning the inn (ie the journey to the inn) in the house in the run up to Christmas.
Alongside that (google tells me) there is tradition of re-enactment when two people dress as Joseph and Mary visiting various houses over 9 nights(1 for each month of pregnancy), singing songs until they are allowed in. This represents the way Mary and Joseph were forbidden room at the inn.

As I needed them to face two different ways they needed to be double sided.
Each side is not quite the same.
On one side, we see Mary's leg and foot and Joseph with a stick. And Mary holds the donkey's ear.
On the other side, we see Joseph carrying a bag and Mary sitting side saddle, with just her bottom visible. Her hand on her stomach. Inside the figures is two layers of cardboard to make them stronger and hold their shape better.
But for both, I wanted Mary's hair to be covered. I felt this would be both practical and likely on a journey encountering others.
I then had to decide if I would cover the scene in a leaf, technically Joseph and Mary should be placed on the scene and then moved to the next spot. But I thought for consistency and ease, they should be in place at the start and then move, and so I made a leaf to cover them

There weren't a lot of interactive elements in the whole project but I built on this later with the nativity scene. More on that later.

Sunday, 14 July 2019

4, 5, 6 pick up... a suitcase?

I had originally imagined I would find lots of parts of the story to fill every single stage, but this was very rapidly obvious I wouldn't be able to do. I also realised I would lose patience if I did larger scenes for every stage. I decided interspersed among larger scenes I would have littler ones that were simpler or just easier in some way.

The first 7 scenes were all about the start of the journey. 1-3 about finding out about the pregnancy, but then 4-6 about preparing for or anticipating the journey to Bethlehem (Luke 1-5)

Scene 4 - a scroll with the word Census on it Scene 5 - a brown suitcaseScene 6 - crossed keys
Thus 4 is the Census that kickstarts the journey.
Then you have 5 and 6 and I thought about what you take on a journey, specially from a child's perspective - which is a suitcase and keys.
Obviously neither would necessarily be a real thing for Mary and Joseph at the time but they would be comprehensible to a child.
Keys also have added symbolism for Christians with the image of the keys to the Kingdom of God (Matthew 16:18-19) being offered to Peter and a symbol of the Pope in the Catholic church.

Alongside deciding to have some smaller scenes to sew I decided since they were different in shape and scale I would have a different style of leaf. Also although I had a fair amount of the leafy green material I used for the larger scenes I didn't want to run out, and I did have a variety of other leafy decorated material scraps. Some of these leaf or faintly plant-y or green scraps were too small for the larger scenes and satisfying to use up as well.
Leaf 4 - a bluey material with a wild rose open flowers pattern Leaf 5 a pale yellow green pattern of leaves in greeny colours with a bit of orange Leaf 6 a pale blue background with rose buds partially open and pale green leaves

A brief flit by - scene 3


I'm not intending to do posts for every individual scene, but unfortunately, I can't work out how to group this one with the ones following it, so I'm going to do a quickie, and then a longer post.

slightly later stage of construction of pregnant Mary to pregnant Elizabeth - body and head is sewn down but no details, waiting to be embroidered on
Early stage of sewing The visitation of pregnant Mary to pregnant Elizabeth - back showing the design guideNumber 3 is "The Visitation"
- the visit of Mary to her cousin Elizabeth, mother of John the Baptist. The scene is a sort of tag on to the double header of my angel related scenes.
The last of the preamble stuff before the proper story of the journey of nativity really. (Luke 1:26-38)

 I didn't really have a complex design in mind, and the only thing that changed at all was I had originally designed them both with their hair covered (you can just about see in this pic from the back of an early stage).

Typically European Catholics at least depict Mary with a full covering of her hair, or at the very least a veil. And I just went with that in my first design, but I didn't like it particularly and I wondered if she would really wear her hair covered when with a female cousin. I looked into Jewish customs around hair covering, and it seemed like she wouldn't, so I gave them hair instead. Although apparently one way to cover your hair in some Jewish customs is to cover it with a wig! So maybe it didn't matter.

I like the simple shapes of this scene and how it came out.
Final completed scene, Mary and Elizabeth are depicted with very simple shapes to show their pregnancies with their hair uncovered

Friday, 12 July 2019

In the beginning (scenes 1 and 2)

So you may be wondering - why so long between posts...welll actually there was a gap but not quite as long a gap as it looks. According to the tags in the photos I took, my earliest full sketch of the whole thing was in August 2017 and I was probably thinking about it even earlier than that, so from April 2016 to July/August 2017 is not such a huge gap really. That it took me from then until now to finish...well that's another story.

I did also do a mini project in August - a thank you to my Japanese hosts but because it's based on their name I don't want to post it up here.

One of the early design and layout ideas I had from the very start was that the first two pictures would be two elements of the story of Jesus' conception and parents relating to angels. Both Mary and Joseph are visited by angels. The nativity story is only told in the gospels of Luke and Matthew, and each of them only relay one of these stories. Luke has the annunciation when Mary is informed of her pregnancy (Luke 1: 26-38). Matthew has the dream of Joseph when Joseph is told not to put Mary aside for being pregnant (Matthew 1:18-24).
I wanted these two images to book end the top row of the design. This is one of the elements that never changed from start to finish of the layout and design.
Top half of the design of the advent calendar - an early draft showing Mary's annunciation on the far left and Joseph's dream of the angel on far right as well as other stories
I wanted the figures of Mary and Joseph to face each other and the designs to be mirrors of each other. The only real difference is that Mary's eyes are closed in prayer, and Joseph's are open and looking at Mary. The clothing colours are deliberately both shades of blue, and are repeated throughout the whole project for those characters
As a result when it came to the angel's wings. I made a pattern that I used for all 4 of them. I actually cut the pattern out 4 times but I only really needed one!
Three of the four wings for the angels in the scenes of Mary and Joseph meeting angels, sewn and ready for attaching to the two scenes
I also was in such a hurry to start that I think for one of the two I forgot a really easy basic construction detail of most of my picture designs - a base layer of interfacing. I slightly regretted this as the background material velvet was a bit stretchy!
Early stages of Mary's Annunciation being pieced and sewn togetherMary's annunciation with the angel mostly sewn in place and embroidered but Mary unfinishedEarly stages of Joseph's encounter with an angel in a dream being pieced and sewn together Finished no 1 - Mary meets an angel - Annunciation Finished no 2 - Joseph dreams of an angel
Another thing I decided to learn from previous projects was - don't leave all the boring stuff till the end. Almost every scene has a "door" made in a leaf shape. I did them as I went along rather than being bored at the end. 


Early version of leaf door covering number 1 -  Annunciation Final version of leaf door covering number 2 - Joseph's dream - includes the numbering

When fashioning these first leaves I very quickly decided it was OK if some of the design was visible around the edges of the leaf - a sort of way to guess and remember what came next. After all, it would only be a surprise once. I was very lucky, I had this great green fabric for the leaves from a friend and the amount was just enough for all the leaves I wanted in that colour and fabric. Well, nearly, but I'll come to that later.

Numbers were added much, much later so I could be sure of the entire sequence, although as previously mentioned, Mary and Joseph never moved from positions 1 and 2. 

Monday, 1 July 2019

Christmas was a long time ago

When I was a child my Dad made us this beautiful advent calendar out of card in the shape of a house with Christmas card scenes behind each door. I think it was this and a life as a church going Christian reconciling commercial 25 day advent calendars and the religious festival of advent - 4 Sundays leading up to Christmas that started this project's journey. That and I wanted to make something for my latest nephew, something that could be used easily and had real purpose, so I hit on the advent calendar idea.

As with all my projects, it seems huge but it's broken down into modular sections, each of which are an achievable size in a short time frame.

Of course making things small scale has its own problems, and can make stitching quite difficult, or designs simplified from the original plan.

Early on there were a few core things I wanted to do overall.

  • Have as many of the Christmas story elements in there as I could
  •  I wanted the whole thing to feel a bit like a tree of Jesse (family tree of Jesus)
  • There to be this idea of a path going along - the journey of Jesus' parents to Bethlehem.

I also found early on in design that I rapidly got tired of so many beards and so many men. I made a conscious choice to include more women, and, to look into interesting biblical women, who were not just mothers, and perhaps, some slightly obscure and less well known figures.

Unlike some of my other projects I've blogged about this is a retrospective series of posts, and so I'm not quite sure what I will remember or what I might choose to say about any or all of it.

I will probably update this post afterwards with links to different sections, or I may add an index post. I'll see how I go.

Wednesday, 27 April 2016

I'm blue da ba dee da ba die

So my latest requested plushie was Grimmjow Jaegerjacquez - a character from Bleach manga. I confess I was not familiar and had to do some research for details and query others.

He's had a variety of outfits but I think this was the one requested.
Grimmjow Jaegerjacquez source image from animeGrimmjow back view
The most exciting challenge for me was the fact that he has a hole through the middle of his body. A fact that reminds me of Existenz (1999) a film where people get a hole in their back and jack into some kind of gaming network.  It's not at all the same but every time I was planning this aspect I kept being reminded.

I was going to photograph the process but as the hole through the middle involved a black tube of felt attached to one side at one point at around the middle of his body... I leave you to guess why I didn't.

Anyway, I was a little nervous because I had to guess how wide his body would be and therefore how long the black tube would need to be but fortunately I guessed OK.  Essentially in order to be able to turn him right way out after sewing the two sides together I had to leave one end free. Once the right way out I could then attach the far end of the tube. Then, to stuff the doll I left a pole through the hole so that it didn't collapse while I stuffed the body.

I can't photograph in a way that shows you that you can see through the hole but it's kind of cool.

Grimmjow stage one - body is complete including "Hollow" hole - front view

Grimmjow stage one - body is complete including "Hollow" hole and 6 tattoo - rear view
The next stage was the short jacket. The description on the wiki says a turned up collar and the sleeves rolled up, white, with black lining.

I'm not good at lining things so I tend to just line each piece and then turn them inside out and attach.
Grimmjow stage 2 - jacket left sleeve complete, right sleeve to be sewn
Unfortunately this meant somehow the sleeves were too exact to roll up but I still like the effect.
Grimmjow Jaegerjacquez complete with jacket
Hopefully the new owner will like it too! They liked stage 1 (without the jacket) so here's hoping.