Sunday, 1 June 2014

Making things is magical

I can hear the HP theme already....

So I made a Dumbledore. In the end, that person, who had already ordered a Snape (I finished that a while back), I gave her the Harry Potter I made aaaaaaages ago as the person who ordered that  was an ex colleague, and wasn't paying for the privilege and was never going to visit again to collect him so I figured he was mine to pass on to a loving home. That makes a nice trio to have.

Dumbledore has had 2 incarnations in the movie, who dress very differently depending on the actor playing him.

I gotta say the second guy Michael Gambon may have been fun to watch but his outfit was not all that thrilling and he somehow came off to me as more of a Gandalf type with all the greys.

Michael Gambon as Dumbledore (and Gandalf lookie likey)
I did debate making him but with the customer's permission I went ahead with a more Richard Harris influenced creation.

Richard Harris as Dumbledore

A lovely reds and brocade look.

I didn't quite have brocade but I had some reddish, if not maroon coloured fabric.
The first stage involved the basic body of the plushie and the under fabric for the hair, which I planned to add to with wool. I decided his legs should be grey for want of any other better choice.

Dumbledore plushie early stage, no skirt on his under-robes, and his hair is a bit minimal
 Next stage was adding on some proper hair and I decided to go all out and give him lots and lots. It's a thin white wool if you're interested.
Dumbledore plushie as I sew on white wool for his hair and beard
At this point I needed to sew on the bottom of his robes so he had to have his hair tied out of the way. I'm sure NORMAL people would have done this before the hair, but no-one ever called me normal!!

Dumbledore plushie hair is done and tied out of the way while I pin on the skirt of the under-robes
 Next stage was his robes. This is a sort of rich red velvet.
Dumbledore plushie with hair and over robes completed
 I added a little bit of detailing by backing some lace ribbon with some yellow ribbon and adding it to the edge.
Close up of the lacey edging to the over robes of the Dumbledore plushie
 I did a similar process to make the edge of the hat.
Dumbledore complete with hat and wand
 I did debate cutting down his hair and then decided I liked it long. Fortunately, so did the customer!

Wednesday, 16 April 2014

A Harry Potter diversion

So I got a commission from a friend at work. It started with one and quickly crept up to 2 but as far as I'm concerned if you're paying you get to say how many you want.

Her requests were :

1. Severus Snape
2. Albus Dumbledore

This is not my first Harry Potter plushie as I did the boy himself Harry Potter a good while back.

I did warn her early on that Snape was not likely to be super complex or very very obvious. His colour scheme is so simple it's hard to make it distinctive. I did have some fun looking up details as I always do.

I noticed for example, that there is obviously some kind of white undershirt going on under his tunic just faintly obvious at cuff and neck.
Close up of Snape in Harry Potter films
His tunic is also a dark navy blue, and has button detailing down the middle and along the arms.

I also noted that his robes don't seem to have separate sleeves


And his legs are black trousers or leggings with black boots.

I was going to make him very pale but I got distracted by being efficient and ended up cutting his face colour from the same pinky colour as Dumbledore which I did at the same time.

Apologies, no making of photos.

At the end I suddenly had a couple of small thoughts of cute accessories. I made him a wand out of a twisty metal covered in black plastic thingy and ...

Completed plushie of Severus Snape
 A little book saying property of the half blood prince - which is him after all!

Snape's accessory - a little book with the inscription property of the Half Blood Prince Advanced Potion Making by Libatius Borage
The new owner seems happy so yay! On to Dumbledore.

I also now appear to have a waiting list again

After Dumbledore there is :

1. Thor
2. Babydoll (Sucker Punch)
3. Mystery plushie to be revealed at a later date!
4. Hermione Granger

Thursday, 20 February 2014

Back to the Future II - ish

So I'm afraid I didn't do many making of photographs of this, just this blurry one:
Cutting out fabric and ironing on interfacing for Marty McFly plushie


The biggest different technique I used here was interfacing. I added it to some fabric which was the perfect colour for the denim but was the wrong weight and also very stretchy which is a pain to work with. I also added it to the stretchy face fabric to make my life easier. I'd done a little bit of this for Doc but this time I used it in a big way on the face. It was so great. Only slight problem was forgetting the stretchy fabric might need a cooler iron and ruining some bits by slightly melting them. Oops.

So the main pics I have are some reference pics.

His period outfits are sometimes a bit varied but the most familiar costume is the jeans and blue check shirt with a red bodywarmer/windcheater.

Marty McFly film screen cap

I have to warn you I am not feeling patient so although I made sure I did the right shoes - this photo was so useful for that:

Marty McFly shoes screenshot and modern Nikes that look similar photo comparison

I'm afraid I just couldn't be bothered to do braces this time as in this screen shot

Jennifer, Marty and Doc screenshot showing Marty's braces

I did give him the red under t shirt though.

Marty McFly plushie completed!

I'm taking a rest before Clara although technically I don't have a choice, the nearest I have to a pale peach colour is just not similar enough to Caucasian flesh-tones being more of a bluey pink.

I'll be posting it off soon!

Tuesday, 11 February 2014

Doc Emmett Brown

This plushie will eventually be part of a trio but for now he's flying solo. I mentioned earlier why I chose this specific outfit so the next stage was basically some cloth choices.

He isn't a complex design in essentials, with no fiddly parts to his costume.

I had intended to do the hair with cloth but it came out a bit pressed against his head so I decided I'd use some wool a bit like Loki.

Doc Emmett Brown (Back to the future) plushie in progress, before additional hair and jacket were done

Although I'm not unhappy with Loki's hair, it didn't entirely go the way I'd like it to look, but I feel it works particularly well here. The sunnies are card with cooking foil on them and I embroidered on the watches on both wrists. The jacket material was stretchy which drove me a little crazy but worked out fine.

So here he is finished!!

Doc Emmett Brown (Back to the Future) complete with sunglasses and jacket


Not bad compared to the original eh?

Comparison image with both a still from the film and the plushie side by side - Doc Emmett Brown (Back to the Future)

G[r]eek Alphabet - so long and thanks for all the fish

Amazingly, astoundingly, I am done. The main sewing started in August and has gone on sporadically ever since. I finished the fronts a little while ago but then had to make all the backs and the base. Thankfully my Mum came to the rescue with the hanging and making a pole for it to hang from and machine sewing on the velcro.

But the backs were a little bit of a chore. So in order to get them done I forbade myself from doing much more on the final extra letters until I'd done the backs. The backs after a while were sort of meditative but the sewing through the velcro never really got fun. It's tough stuff, not as tough as fake or real leather but pretty tough all the same. I've had other things to do but I basically entered the home stretch recently and finally in the last week or so I started on the absolute last letter. I finished sewing the back to the front today on that letter and did some extra finishing touches, which I don't want to talk about (they're not all that exciting anyway).

So here it is hanging on the wall of my flat.

All that remains now is to give it to its intended recipient. He's a bit older than I planned - about 5ish months old and he won't be reading for a while but I am really looking forward to giving it to his Mum and Dad for him to enjoy.

Thank you all for your positive comments and thoughts along the way. I'm not sure what big project I'll do again but I'll be sure to let you know. In the mean time there are some plushies. I'm just about to write up a separate post about Doc Emmett Brown from Back to the Future which I finished at the end of January.

Saturday, 4 January 2014

Toys toys toys

Well, out of nowhere, I appear to have a list of plushie commissions so I thought I'd write a note about it to keep myself on track.

I've been asked for one very recently due end of January, so it has bumped some non time sensitive ones down the list. Apologies to those whose requests they were.

  1. Doc Emmett Brown (Back to the Future films) (due end of Jan)
  2. Hermione Grangers (Harry Potter books and films) (deadline tba)
  3. Edward Cullen - take 2 (Twilight books and films) (deadline tba)
  4. Clara Clayton (Back to the Future films) (deadline tba)
  5. Marty McFly (Back to the Future films) (deadline tba)

Doc Emmett Brown

Starting with Doc, I've got the fabrics chosen and cut out and it shouldn't be a huge technical challenge. I had some thoughts about his outfit. He wears several very iconic outfits throughout the films.

The lab coat is a classic but not very exciting or very visually easily recognisable as Doc on a simpliefied plushie. It could come out, much like some of the buyable costumes looking like a cross between ANY mad scientist and a spoof of Einstein.

Doc Brown in a labcoat with goggles

The radiation suit is also a classic but not very interesting once it's been simplified into a plushie.

Doc and Marty in the parking lot, Doc is in the radiation suit

He's also worn a rather uninteresting Western style outfit.

So in the end I went with the rather more colourful yellow suit with a red shirt combo.

Doc in yellow jacket and red shirt combo

Sadly I don't have anything patterned for that fabulously insane red shirt so it will be just textured red, but I love that he's also wearing green boots with red laces with this combination. So that should be a loooooot of fun.

Technically this is a relatively simple adaptation of the classic pattern so hopefully it should be quick.

The only unfortunate part is it does mean it will slow down completing my alphabet. I'm now up to letter T, which leaves six main letters to do, plus the three extras. Although I haven't completed the fronts of two of the extras yet.

Wish me luck. It should be definitely a blast from the past!

Thursday, 2 January 2014

I STILL aten't dead - but Loki is done and dusted!

I stayed up all night to get Loki....or rather I dropped everything to finish Loki in time for Christmas as he's a present from one friend to another.

Loki's costume as I mentioned between the Thor films and Avengers and variants within is a complex costume. I am endlessly grateful to a friend of mine who having cosplayed a Loki had lots of reference pics to help me, and as another friend had made the costume I loved that I was using Loki cosplay offcuts to make a Loki plushie.

I essentially decided to go with a version of his golden-y armour to add a bit of extra bright to the other dull colour palate of dark green and blacks.

Loki scale doll model

I had to plan how I was going to do it layer by layer as you can see from the drawings

Loki body / bottom layer plan of plushie Additional planning sketch of Loki's underneath tunic Loki tunic coat planning sketch for details Loki final layer cloak and helmet planning sketch Planning sketch of Loki's staff Final design pattern for Loki plushie
I had a bit of time dithering about fabrics because although I wanted to use some of my fake black leather stash I just didn't fancy sewing too much fake leather. In the end I decided this Loki would not have leather boots as I just couldn't face an almost entirely leather base body.

Fabrics during planning of Loki creation
Once I started making the basic body it was fiddly with several different fabrics coming together. I am always adapting the pattern but I'm also very forgetful of things that don't work.
As you can see here I forgot quite how to get the hair to come out above his face properly as I had been distracted by the slicked back seal like quality of Loki's hair in the movies.
Loki plushie came out looking bald not slicked back.
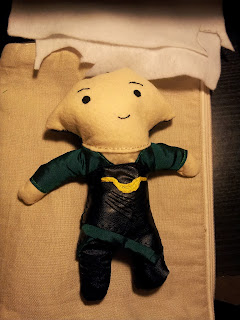
Initial basic Loki plushie - hair has not come out right
This then left me with essentially making a cap of hair to fit over the top and sew down to add to his hair.
Loki plushie with extra hair stage 1 Loki plushie with added hair stage 2
That being more or less sorted I headed on to making the coat. I still wasn't entirely happy with the hair though. Although I always regret it while I'm using it I really wanted to make the zip like edge of Loki's coat using my metallic gold thread and I like to think it came out pretty darned well.
Loki's coat adding zip like edgingLoki in the movie, head close up showing edge of the jacket with zip like effect
That being said the coat was made of a thicker fake leather than the basic body's tunic meaning it was really really annoying to sew.
Loki plushie the first stage of coat
I also carefully lined the coat only to remember he has 3 tails and had to unpick the side stitching and cut 2 v's in the back to make the three tails. Sadly after all that effort I didn't photograph that particular detail.

I then made the cloak. Before I moved on to make the helmet and staff I started to dither about the hair and consulted friends about possibly adding some thin wool so he had those sort of rats tails under his helmet. With at least one friend's affirmative I went ahead. As I sewed each one down individually it has come out looking a bit like braids but I don't mind it much.
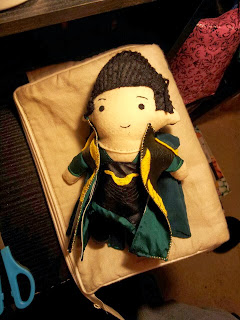
Loki plushie with coat and updated hair with wool Back view of updated plushie with wool hair addition
The final details were the helmet and staff. I really wanted to make the pointy back shape of the helmet
Loki wearing helmet in the film
But once I'd made the helmet, sewing a ridge for the pointy-ness just didn't work. Then I went on to the staff.
Cosplayer's replica staff
I originally planned to make it with just a few bits of pipe cleaner in yellow and grey and some blue cloth. But it didn't look all that great. I can't find any photos of it when it looked like that.

So I kept pipe cleaners for the basic staff, but used some felt sewn to a couple of layers of paper for the knife blades and scammed some blue beads off a friend for the jewelly thingy. With that it went off in good time for Christmas present gifting and both the person who had requested it and the recipient appear to like him very well.
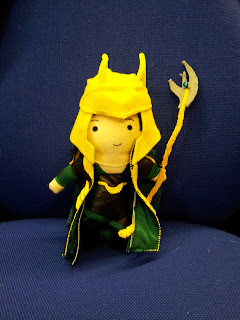
Completed Loki and staff

But what about the ALPHABET?

What? An alphabet you say? No idea what you're talking about. OK OK I'm kidding. I'm still working on it after my brief hiatus but I'm at a dull stage. I'm making all the backs. There's not much to see as such.... I'm up to letter R and they're looking spiffy.

Here's a pic of it hung up at my parents' house when I'd got as far as O.

G[r]eek Alphabet wall hanging with the completely finished letters at that stage A - O

Sewing through the tough plastic-ky velcro strips has necessitated some new tools - rubber thimbles. They don't stop needle pricks completely but they do allow gripping and give some good protection, plus they're slightly warming! They look a bit weird though. I am however glad for the tip from a friend who suggested them.
Perils of sewing through velcro - the need for weird purple rubber thimbles